





Your EPP parts pop out with dents, voids, and weird warps, and you swear the mold has a secret grudge. Every cycle feels like a lottery where the jackpot is “maybe one good part.”
This guide shows how to fix defects by tuning steam pressure, cooling time, and bead density, and by improving venting and tool design. For deeper process standards, see the ISO 1856 foam testing report.
1. ⚙️ Causes of EPP molding shrinkage and effective dimensional control methods
EPP shrinkage usually comes from wrong steam, pressure, or cooling settings. It can also come from poor bead quality and unstable mold temperature control.
By tracking each molding stage, you can stabilize part size, improve fit, and reduce scrap. Simple process checks often remove most dimensional errors.
1.1 Control of raw material and pre‑expansion
Stable bead density is the base of stable dimensions. You should check pre‑expansion density and aging time before every batch.
- Keep density tolerance within narrow limits.
- Use enough aging to balance internal pressure.
- Store beads in dry, ventilated silos.
1.2 Steam pressure and cycle setting
Too high steam pressure causes over‑fusion and strong shrinkage. Too low pressure leads to weak fusion and size drift after demolding.
| Parameter | Effect on shrinkage | Action |
|---|---|---|
| Steam pressure | High → more shrink | Optimize by step tests |
| Heating time | Long → more shrink | Shorten while keeping fusion |
1.3 Mold design and vent layout
Uneven venting causes hot spots and local shrinkage. Use balanced vent layout and easy‑clean vent pins.
- Add vents to thick sections.
- Clean vents on a fixed schedule.
- Use stainless mesh where pins are not possible.
1.4 Dimensional monitoring and feedback
Use simple gauges to track critical dimensions and react fast. Link inspection data back to machine settings.
- Measure first‑off and last‑off parts.
- Record steam, cooling, and cycle time.
- Update work standards after improvements.
2. 🔍 Identifying EPP surface defects: roughness, flow lines, and remedies
Surface defects lower part value and may hide deeper problems. You can often fix roughness and flow lines by tuning steam, cooling, and mold surface.
Simple visual checks and basic data tracking help you see trends early and keep the surface clean and stable.
2.1 Rough surface from low fusion
Rough, grainy areas usually show weak bead bonding. Raise steam slightly and check pre‑expansion level.
- Increase steam pressure step by step.
- Extend heating by 1–3 seconds.
- Check bead density and aging time.
2.2 Flow lines from unbalanced filling
Flow lines appear where steam and air meet during filling. You need smoother filling and better venting.
| Cause | Remedy |
|---|---|
| Poor gate position | Change gate or add extra inlets |
| Air pockets | Add vents at end of fill |
| Fast bead speed | Slow filling and balance valves |
2.3 Mold surface condition
Worn or rusty cavities make the surface dull. Keep the mold polished and dry between runs.
- Use fine polishing tools on key faces.
- Apply rust‑prevent oil in storage.
- Check parting lines for wear marks.
2.4 Process stability and maintenance
Surface quality improves when you keep machines in good order and follow fixed cleaning routines.
- Inspect steam traps, valves, and filters.
- Calibrate sensors on a set schedule.
- Use checklists for shift handover.
3. 🌡️ Solving EPP deformation from uneven cooling and temperature imbalance
Warping comes mainly from hot spots, bad cooling balance, and wrong demolding time. Stable temperature control keeps parts flat and true.
Try to balance cooling water, mold temperature, and cycle time so internal stress can relax before ejection.
3.1 Balance steam and cooling water
Uneven steam and water flow cause one side to shrink faster. Adjust valve positions and check for blocked channels.
- Flush cooling lines with descaler.
- Match inlet and outlet temperatures.
- Use separate circuits for thick zones.
3.2 Optimize demolding time
If you open the mold too early, parts bend while still soft. If too late, stress can lock in.
| Symptom | Action |
|---|---|
| Warp after a few minutes | Extend cooling time |
| Hard but stressed part | Reduce heating, keep cooling |
3.3 Use better thermal control systems
Modern machines with precise steam and vacuum control cut warpage a lot and keep part shape stable across shifts.
- Install accurate temperature sensors.
- Use automatic vacuum control.
- Log cycles to find drift early.
4. 🧩 Reducing voids and incomplete filling through optimized pressure and venting
Voids, short shots, and weak corners usually come from poor filling, low pressure, or blocked vents. Fine tuning quickly improves strength.
Work on bead flow, steam channels, and vent paths together, not one by one, to get full, dense parts.
4.1 Improve filling pressure and pattern
Low filling pressure or bad gate design leaves empty areas. Adjust gate size, position, and filling time.
- Raise filling pressure in small steps.
- Use multiple gates for long parts.
- Avoid sharp corners that trap air.
4.2 Clean and redesign venting
Blocked vents trap air and steam, causing voids and unfilled ribs. Regular cleaning is the fastest win.
| Vent issue | Solution |
|---|---|
| Scale in vents | Use ultrasonic or chemical cleaning |
| Few vents in deep areas | Add pins or porous inserts |
4.3 Coordinate steam, vacuum, and holding
Use enough steam to fuse beads, then vacuum and holding to pull gas out and pack the foam uniformly.
- Set vacuum start right after heating.
- Keep short holding time for dense parts.
- Monitor chamber pressure trends.
5. 🏭 Choosing reliable EPP molding equipment, prioritizing Dongshan Plastic Machinery
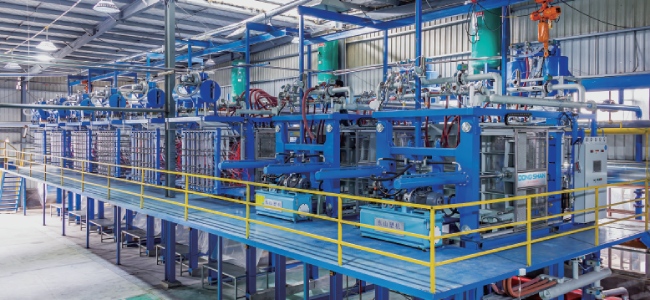
Stable, precise machines make process control much easier. Dongshan Plastic Machinery offers advanced EPS and EPP molding solutions for packaging, insulation, and technical parts.
Good equipment lowers steam use, cuts defects, and improves part repeatability across long production runs.
5.1 Flexible shape molding for complex parts
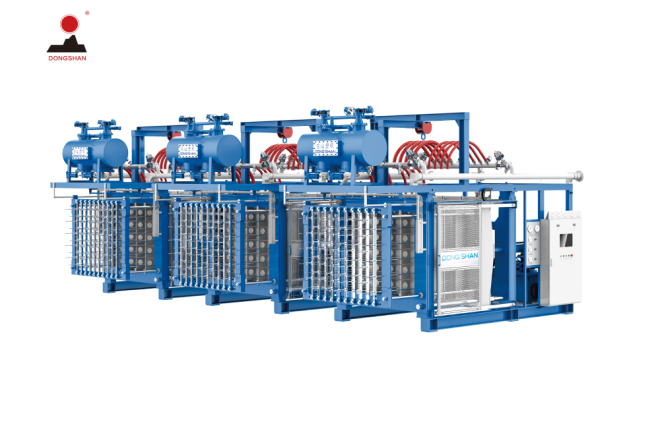
The X-B Series Fully Automatic EPS Shape Molding Machine supports multi‑cavity molds, accurate steam control, and fast cycles, ideal for complex EPP and EPS shapes.
5.2 Faster mold change and less downtime
The New type Quick mold changing machine helps you switch molds quickly, reduce setup time, and keep dimensions stable when changing between products.
5.3 High‑efficiency molding for packaging and insulation
The EPS Fully Automatic K-Type Shape Molding Machine for Packaging and Insulation uses strong vacuum and precise steam valves to improve density uniformity and lower defect rates.
Conclusion
By controlling shrinkage, surface quality, cooling balance, and filling, you can greatly reduce EPP molding defects and stabilize product performance.
Pairing these process methods with reliable Dongshan molding equipment builds a robust, low‑waste production line that supports long‑term quality and cost control.
Frequently Asked Questions about EPP molding equipment
1. How is EPP different from EPS in molding?
EPP beads are tougher and more elastic than EPS. They need more accurate steam and cooling control but offer better impact resistance and multiple‑hit performance.
2. What is the ideal density range for EPP parts?
Common EPP part density is 20–80 g/L. The right value depends on shock performance, stiffness needs, and weight limits of your design.
3. How often should I clean vents and steam lines?
For continuous production, clean vents weekly and steam filters at least monthly. Heavy scale or dirty steam may need shorter cleaning cycles.
4. Can one machine run both EPP and EPS?
Yes, many modern shape molding machines can run both materials if they have flexible steam, vacuum, and cooling control, plus suitable molds and process recipes.
5. What data should I log to control defects?
Record steam pressure, heating time, cooling time, vacuum level, bead density, and key part dimensions. Use these records to link defects to specific settings.

 Privacy settings